


So let’s talk code and run through a Demo for CosmosDb.
To follow along, you’ll need an endpoint and key from your cosmosdb emulator (or live Azure Credentials).
A quick word of warning for this though, Azure is a very fast moving environment and some things may not be the same if you come back to this is 12 or even 6 months time. I will try to keep it high-ish level to reduce the chance of this but comment if you find a difference and I can update.
Creating your Azure CosmosDb instance
So I will be using a real Cosmosdb instance, but feel free to use a local version if you want. Just skip ahead and use the appropriate keys in the config.
Start off by going to Azure and logging in or setting up a trial if you don’t have one. Azure isn’t free, so trials are a good way to start because they allow you to have £150 free credit to start learning with.
The portal is a big place, but all we are interested in is the CosmosDb so select it from the left hand menu and then ‘Add’ from the top menu of the selected blade.

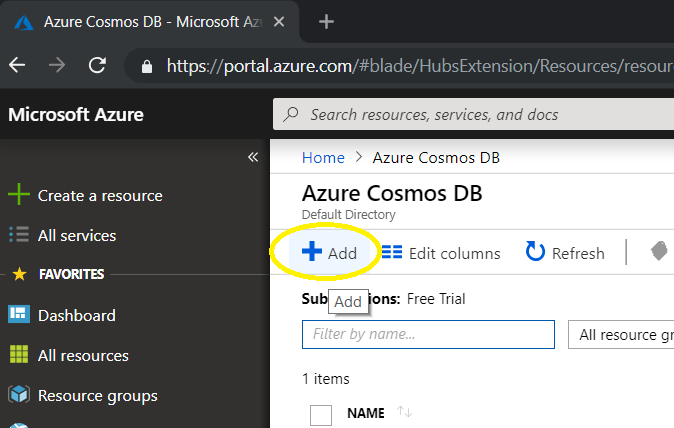
This opens up the first step to creating our database so let’s run through the details.

- Subscription – is the method you are going to use to pay for the resources you need. Hopefully, you have a Free Trial or an MSDN subscription to cover any costs, but there is also Pay As You Go etc.
- Resource Group – this is a subset of Subscription and is effectively a group, folder, container however you think of it. It collects all associated resources together so that you can keep a closer eye on resources or cost later. Create one if you don’t have one, I just created a new one called ‘CosmosDb’.
- Account Name – This has to be a unique name as it is how you will access the database. Try to be meaningful but don’t worry if it’s a bit random.
- API – This is the most important bit of the page as it dictates how your database will be initially configured for use. We went through the basics of this in An Introduction to Azure CosmosDb so pick the API most suited to you, but in this demo I am opting for ‘SQL’ for this demo.
- Location – This is the same as all Azure resources, select the location closest to you.
- Geo-Redundancy – This options allows you to ‘pair’ your location with another geographically equivalent location (like UK West and UK South) in case of problems in chosen Data Center.
There are tabs next for Network and Tags but we will be skipping those and just clicking next until we get to the summary page. Here you can review what you’ve selected, download a template to create this exact setup again and finally, click Create.
It will take several minutes to get this all set up, so go make a cup of tea and come back. You can check on the status of your deployment by clicking on the bell icon in the top menu and looking for the notification relevant to your request.
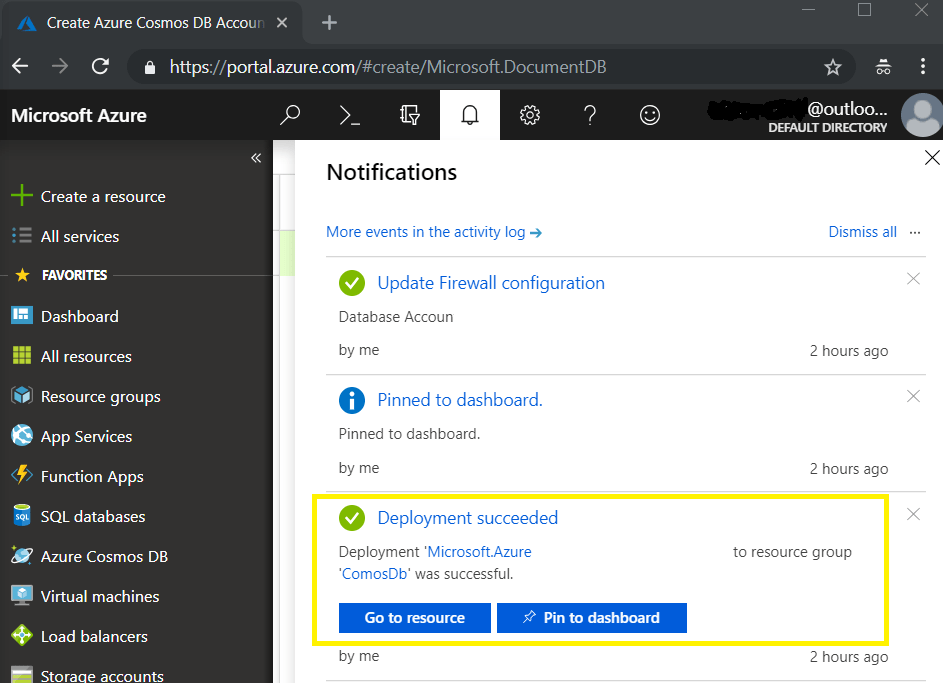
Click on ‘Go to Resource’ to be taken to the main blade. If you get a notification about your firewall, just click it and opt to include your current IP as well as ticking ‘allow access from Azure Portal’ for ease of working.
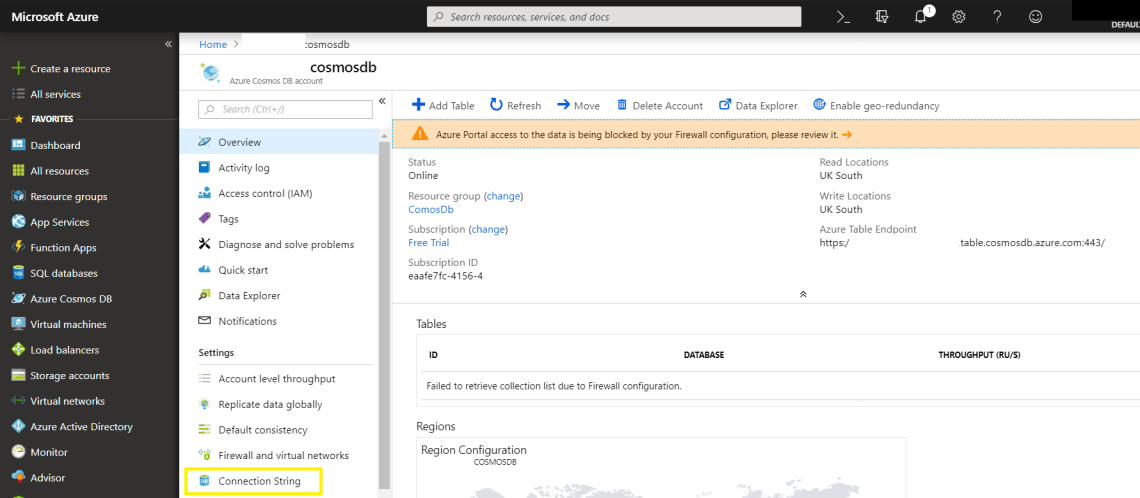
The bit we really want though is the Connection String option in the left-hand menu. This opens a blade with your connection details and specifically the endpoint and primary key values that we want to use in our demo.
Connecting to the CosmosDb
So let’s create a brand new Console Application in Visual Studio and then pop our connection strings in out config.
In the config add keys for our connection, obviously making sure you add your own values! –
<appSettings>
<add key=”CDbEndpoint” value=””/>
<add key=”CDbPrimaryKey” value=””/>
</appSettings>
We will need to add the SDK for Nuget, which is currently called ‘Microsoft.Azure.DocumentDB’. DocumentDB is what CosmosDb used to be called and I think it is still there for backwards compatibility. Once you’ve installed this, we can write some code!
So on to the next demo where we will work with CosmosDb.
