


The difference between labelled and unlabelled ML sets is human interaction. An unlabelled set relies entirely on the underlying API to pick out and discern meaning from the document. A labelled set is given additional information (usually human markup) that helps it create the model that it uses in future.
If you followed along in the non labelled demo, you will be familiar with the high level concepts to follow, but it won’t be the same. The labelled process relies heavily on a GUI to define and review the documents. You will need some basic knowledge of Azure, Storage Explorer and Docker to follow along properly.
In this demo we will define regions for our labels as this increases its accuracy and (in my opinion) is easiest to do through this tool. You can also call the Rest apis directly, similar to the previous demo.
Setting up the Form Recognizer Labelling tool
The tool is provided by Microsoft, but isn’t a web service you can use, you have to set it up on your own machine (or host in your Azure).
Startup Docker and open your command prompt to run the following commands.
docker pull mcr.microsoft.com/azure-cognitive-services/custom-form/labeltool

docker run -it -p 3000:80 mcr.microsoft.com/azure-cognitive-services/custom-form/labeltool eula=accept
Once this has run you can access the tool via localhost:3000
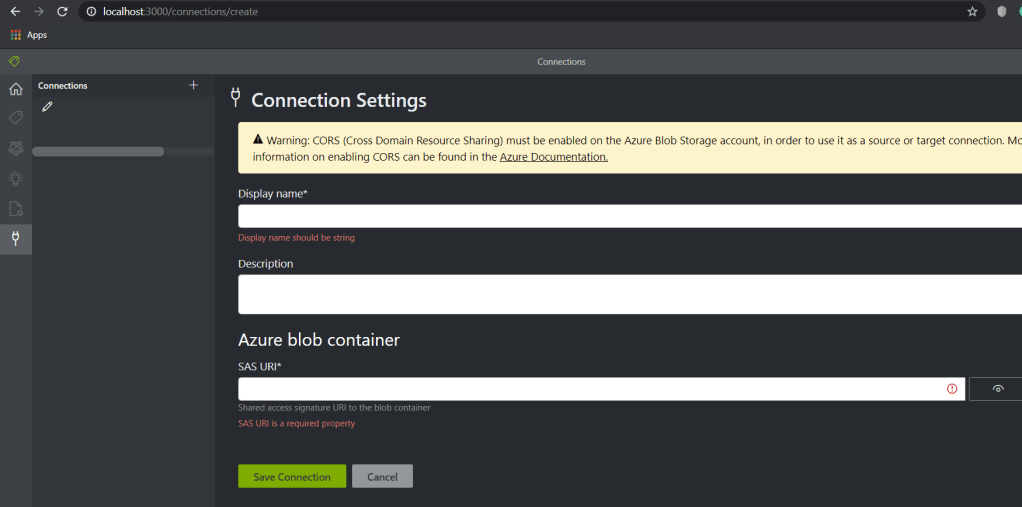
As with the unlabelled process, you need to put your training documents into a storage container. Once you’ve done this, you can click on connections menu from the left hand navigation and let the tool know where this is. NOTE: make sure you have a SAS token with full privileges and is formatted correctly, this is a common mistake and can be annoying later.
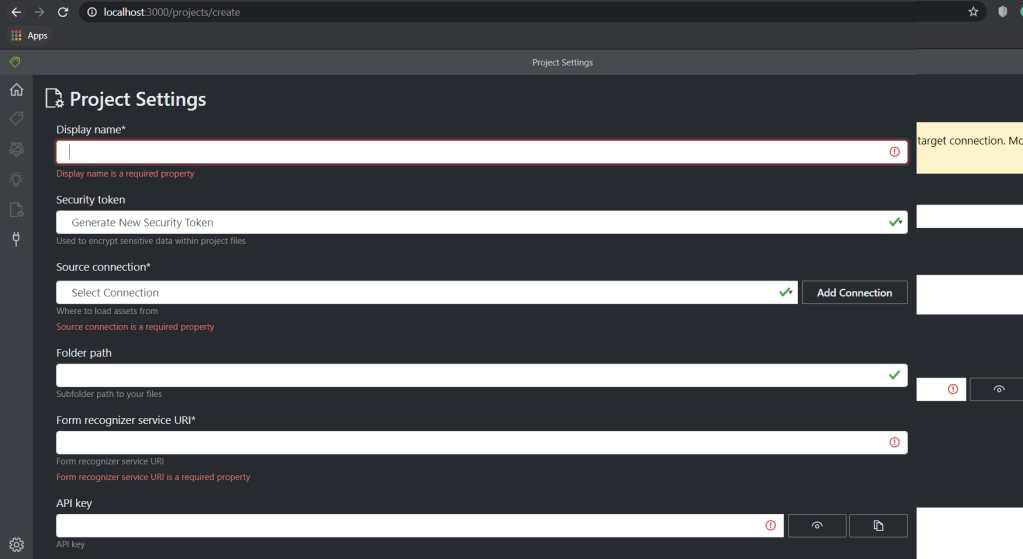
Now create a new Project my clicking on the home symbol in the left hand menu and click the giant plus sign in the middle of the page to get the New Project Page. Pop in all the details required. Make sure you reference the connection you just made and pass in the url and key for your form recognizer api from Azure.
Labelling your documents
In order to train your model, you need to manual label (tag) your documents in order to help the algorithm decide where your data is and how to read it.
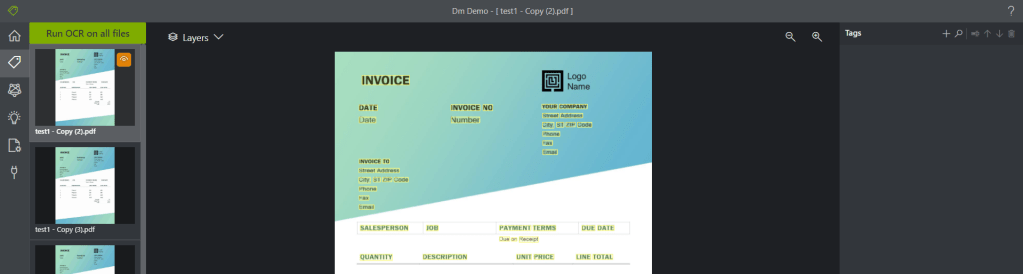
When you open your project you will be taken to the ‘Label’ section and the tool with automatically run OCR for you against all your files in the storage account blob container your specified in your initial connection. The OCR highlights everything it has picked up on in yellow so you can immediately tell if there is an area to work on with
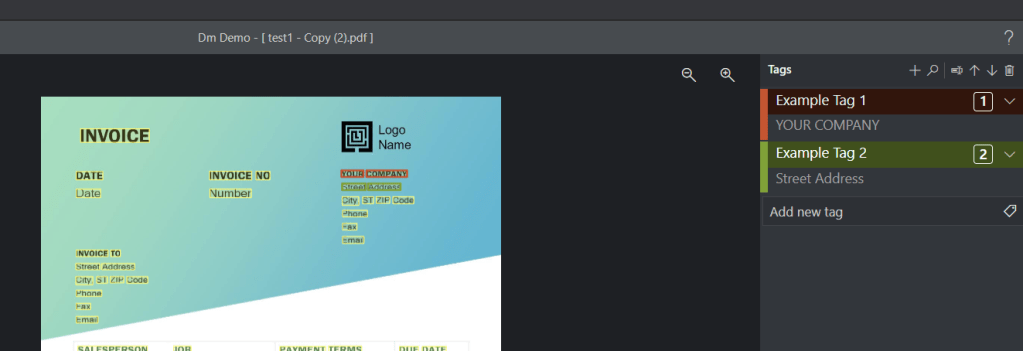
In the right hand pane, you can see ‘Tags’. Here you can add a ‘tag’ (label) which will allow you to give a name to data on the document.
The tool currently struggles a little bit if you try to label too much on a single line, so try to keep lines togther if possible. For example, 1 Fake Road would be 1 property for AddressLine1, not House Number and Street Name.
You will need to label all five (or more) of your sample data before continuing. If you are keen to see results, try labelling only the important stuff for now. You can always come back and amend your tags later in order to extend, add, change, remove or relabel as needed.
Train your Model
Once youve labelled all your documents go the the next icon in the left hand menu (like an atom or something?) and click the green button that says ‘Train’ in the right hand pane.

It takes a few minutes to train, but once it does you will be given an estimated accuracy for your tags and a modelId for future use. The accuracy is usually pretty high on pdfs with printed text, but can be a bit hit and miss for handwriting (especially if you have handwriting as bad as mine!).
If you use MS Flow (Power Automate) or the Rest APIs for integration with this, you will need to pass in the Model Id you trained so if you train multiple models, make sure you know which one is most successful to use the best ModelId!
Testing (Predicting) Documents
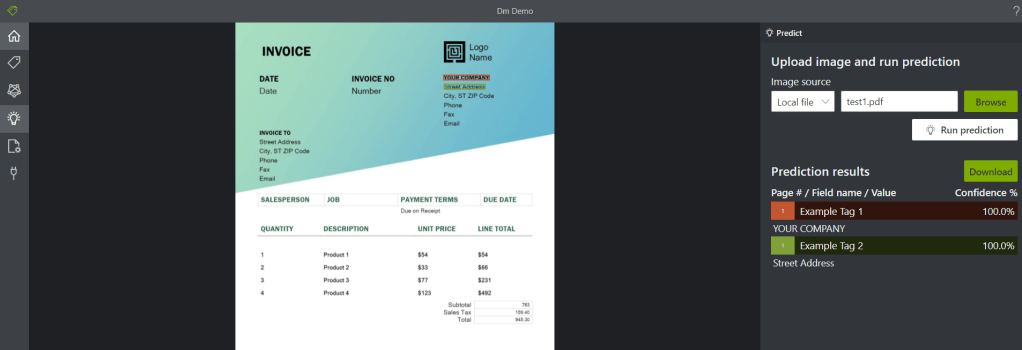
The final menu option on the left hand side is the light bulb which gives you the ability to test your model against additional documents you provide. The left hand pane gives you the option to pass in a local file from your computer and use ‘Run prediction’ to bring back results on what confidence your model had at picking out the values from your labels.
Summary
That’s about it for the labelled (GUI) version! You can do all of this using APIs, but personally I found this tool was nice and easy to install and use. Using the labelled version of Form Recognizer can increase its accuracy/confidence a lot and allow you to define the names of properties to be meaningful to whatever service you then use to consume the records.
