


Recently I had a bit of a specific request, that when a user changed a specific field(s) that they would be required to create a task (or similar) to state why they had done so.
The solution I came up with, was to use a dialog to capture and save the information in the relevant field.
Now a quick word of warning on this one – dialogs are a deprecated Dynamics feature. Deprecated simply means that they are no longer supported which results in them being removed in a future major release. For this reason, I would be hesitant to implement this solution in an online environment as Microsoft no longer allow you to choose when you are getting a major update and this could leave you in an awkward situation if you are capturing business-critical information. Microsoft has detailed how you can replace dialogs in 365 using Microsoft flow and Business Apps, which you can read here. https://docs.microsoft.com/en-us/flow/replace-dialogs but it’s currently online-only features, so I’m not sure how to replace them on-premise yet.
Making the dialog
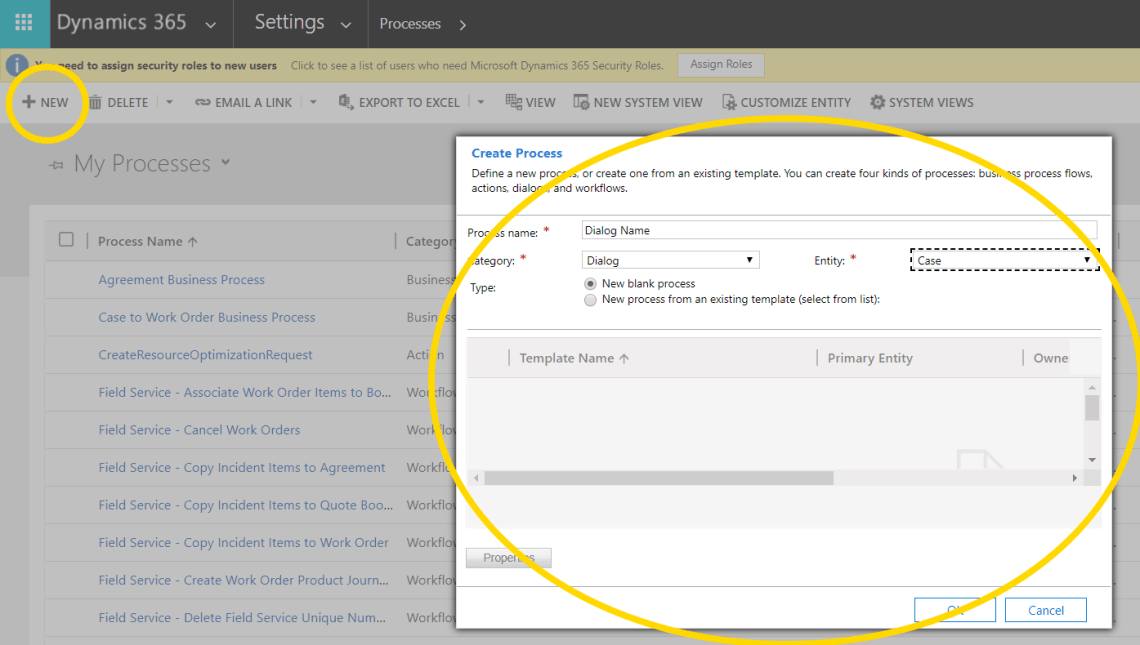
The first thing you need to do is to create your dialog in Dynamics. You can do this by going to Settings > Processes and then clicking ‘New’. This opens a dialog where you give the process a name, a category of dialog and an entity. It’s very important you select the entity you want this workflow to run in the context of (ie case or contact) and category of dialog.
This opens the familiar workflow creation page, where you need to tick ‘as an on-demand process’ and create your dialogs. The example is simple, but you can make this as complicated as you need in order to fit your business requirement. I won’t screenshot this, as it’s not the focus of this walkthrough.
A standard dialog contains a ‘Page’ with a number of ‘Prompt and Response’ arguments on it that capture the information you need. Create as many as you need to do what you need.
When you’re done with your dialog, you can use the rest of the workflow to access the information you collected to create tasks, emails or update field values as needed.
This next step is very important. Save your dialog, but before you close the pop up make sure you copy the id to a save place. You can get this from the URL after the id=.

Calling the dialog with javascript
So you now have the dialog to capture the information you need and the workflow after it to work with the data as required. So how do we trigger it?
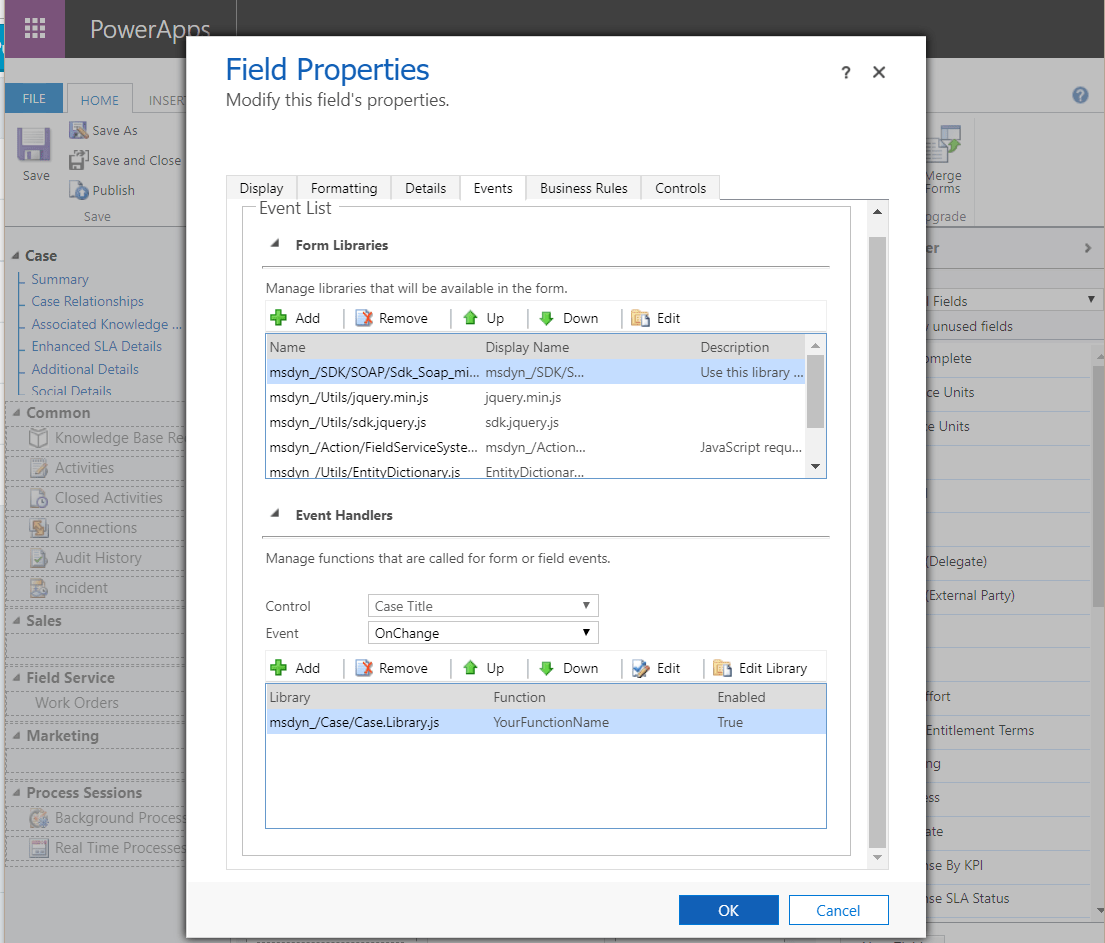
Javascript is key in this situation, so let’s go to the form view in Settings > Customizations > Customize the System and then in the left hand panel expand entities > case and click on Forms. Open your form (likely the ‘Main’) and in the graphical view of the system, select field you want to trigger the event for. When it’s highlighted, select ‘Change Properties’ from the top navigation.

In the resulted dialog, click Events and then expand form libraries. Add a new library and click new to create a new javascript web resource. Use the text editor to copy in the following code.
function openDialogProcess(context)
{
console.log(context);
var objectId =Xrm.Page.data.entity.getId();
var entityName = Xrm.Page.data.entity.getEntityName();
console.log(objectId);
var YourId = //your guid here;
var url = Xrm.Page.context.getClientUrl() +
“/cs/dialog/rundialog.aspx?DialogId=YourId&EntityName=”+ entityName + ”&ObjectId=” +
objectId;
console.log(url);
window.open(url, “”, “height=450, width=450”)
}
It’s very important at this stage that you paste in the id of the dialog you made earlier. Without this, you will get an error when you run the code.
Click Save to create the record and then select the new record as your new library into the form. You can check the library is referenced correctly by selecting looking through your Form Libraries and make sure it’s there.
In the same page, you can see Event Handlers. In this view, select ‘on change’ and then ‘Add’ in order to select your function. Under function, write the name of the function you want to execute without brackets, ie. openDialogProcess.
Click ok and then save and publish the form.
You can then test it and you can see it work!
